LAYING OUT A CALIBRATION COURSE
Return to Investigations Index page
(This is 1 webpage from over 50 web pages at coursemeasurement.org.uk which are used to train measurers. It describes the careful procedure that is needed to establish an accurate calibration course with an error of less than 0.02%)
Lessson 1.2 Layout and Taping of a Calibration Course
To layout a Calibration Course you need the following core items
of equipment
- Steel surveyor's tape 30m or 50m long. Do not use a tape with a plastic
scale, this will not be accurate enough since they stretch under tension and
as the temperature rises much more than a steel tape does.
- Nails to mark the ends of the course, and to use to mark each tape length
+ club hammer to knock the nail into the road
- Notebook and pencil to record readings of the tape.
- A spring balance with which to tension the tape at 50N ( an N is a Newton
which is the same as about 11 lbs or 5kg on your spring scale)

- Hammer a nail in at one end, leaving enough room to hook the tape ring over
the nail. This is NAIL 1.
- You need to know the end correction for your tape. It will remain fixed
so you only ever have to measure it once. Here is how:-

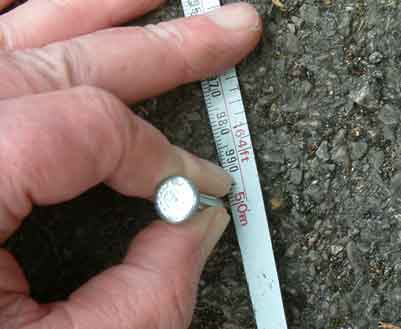
With the tape hooked over the nail, measure from say the 100mm mark to the
centre of the nail. (I have used a yellow spring tape in the picture above)
In this case the distance from the 100mm mark to the centre of the nail is
95 mm. Therefore I have to SUBTRACT 5 mm from each tape length
to correct for the end reading.
- Leaving the ring end hooked on the nail, go to the other end of the tape
and pull it straight and untwist it if necessary. Place the tape on the ground
and hammer in NAIL 2 close to (or just less than) the end mark on the tape.
In the picture below it is being inserted more less at the 50m mark:-

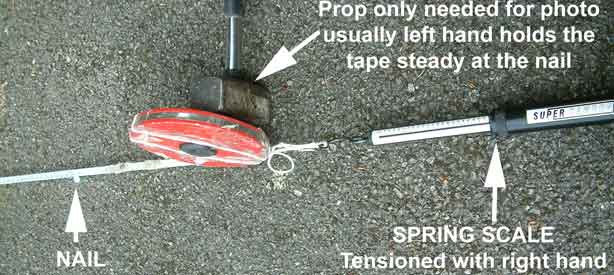
- Now use the spring scale to tension the tape at 50N (approx 5kg). The tension
does not have to be very accurate. The tape will stretch by 5 to 10 mm depending
on its cross-section. With practice you will find that you can hold the spring
balance with one hand, and hopefully get your head over the nail so you will
be able to see the tape reading..

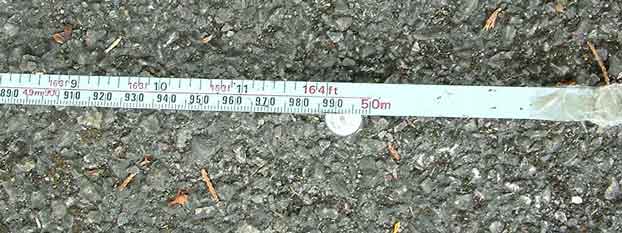
- Now, keeping the tension read the scale at the centre of the nail. This
reads 49.992 m

- Slacken the tension, and write the reading in your notebook.
- Now repeat steps 4 and 5 and check the reading against what you have just
written down.
- You have now measured one tape length and need to repeat for as many tape
lengths the course is. If you have no helper at the other end, you will have
to walk back and unhook the tape at the far end. LEAVE THE NAIL 1 UNDISTURBED.
Place the hook end of the tape on the ground and go back to the reel end.
Drag the tape along the course for one tape length. Place the reel on the
ground and walk back and put the hook over NAIL 2. Walk back again to the
reel end and insert NAIL 3 and take reading of the second tape length as described
above. Repeat this sequence until you have reached the far end of the course.
- You have now measured the course once. All nails are still in place.
- Make a check measurement of the course by measuring back along the course
using the nails you have already inserted to finally end up at Nail 1.
- Compare the corresponding readings.If there is a significant discrepancy,
investigate it while you still have all the nails in place. You might have
misread the tape, with 5 digits to write down it can be easy to get confused.
- Once satisfied hammer the end nails fully in, and you may remove the intermediate
nails to be reused on a future occasion. Remember to record the temperature: better than +/- 5C is accurate enough.
- Paint the road at the end nails so you can easily locate the nails when
you are doing calibration rides on your bike. An example of one way of painting
is shown on the next page.
- Make a good record of the position of the end nails. Ideally by measuring
exactly from some nearby permanent features. Here are
some pictures I used to document a calibration course in Malta so that
I could re-establish it if an end nail was ever lost in resurfacing. You dont
have to bother to take pictures. You can draw a sketch in your note book.
Below I have transferred the content of the pictures to a sketch:

- The method I describe above is known as the solo-method. If you have assistants
it can make the job easier and quite a bit faster. A person at the ring end
of the tape to hook and unhook the tape from the nail is the first useful
addition. If you have two assistants you could use the second to tension the
tape for you while you take the reading. Warning: if traffic
can drive over the tape you may get a broken tape. A person to slow traffic
emerging from side turnings is often desirable. In all cases reserve for yourself
as the trained measurer the job of reading the tape and supervising everybody.
If you think
this explanation looks very complicated to follow, don't worry. I am describing
every step of a practical skill. When you practice this at the practical seminar
everything should fall into place and it wont turn out to be as complicated
as it sounds.


